Featured

How To Speed Up Windows Using ReadyBoost And USB Drive? Does It Still Work?

M icrosoft first introduced the functionality to use a USB drive or SD card as a memory cache in Windows Vista in the form of a feature known as ReadyBoost. The feature was also inherited to Windows 7 and later versions, but with the ability to configure more than one USB drive for ReadyBoost. So, what is ReadyBoost in Windows? ReadyBoost is a feature that speeds up Windows by storing application files and data as cache in a USB drive. This disk caching is beneficial in case the system is running a slow hard drive. ReadyBoost works with USB drives, SD cards, and CF cards. However, it may not be able to deliver considerable performance in the case of newer hardware. So, if you’re stuck with an older hardware, you can speed up Windows using ReadyBoost and USB drive. How to speed up Windows 10 using ReadyBoost? As mentioned earlier, you can use a USB drive, SD card or a CF card to enhance the performance of your Windows 10 operating system. In the case of SD cards, pl...
How to Prioritize Notifications in the Windows 10 Action Center


Well, if you are using the Windows 10 operating system for a while, then you might be well aware of the Action Center. Action Center is just like a Notification Panel on Android which acts as a central location for all your notifications to Windows. Before Windows 10, there was no Action Center.


How to Set Notification Priorities for Apps in Windows 10 Action Center

So, in this article, we have decided to share a working method that would help you set Notification Priorities for Apps in Windows 10 action center. So, let’s check out how to prioritize which notifications you see from the Action center on Windows 10 computer.
 
The method is quite straightforward and easy, and you just need to follow some simple steps that will set the priorities of all the notifications. So follow the steps below to proceed.

Set Notification Priorities for Apps in Windows 10

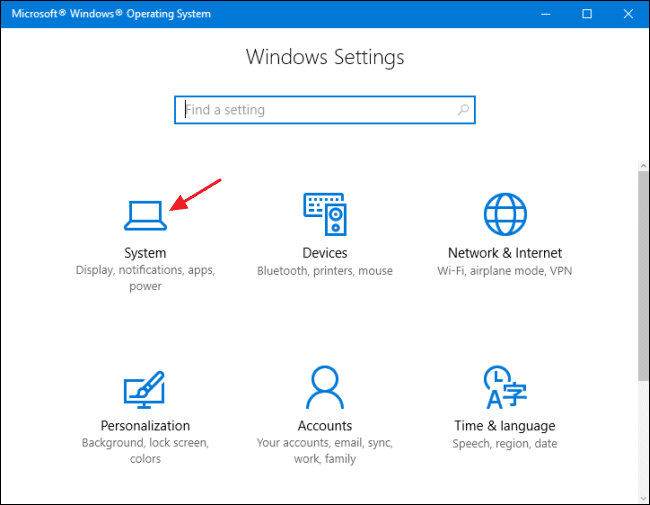
Step 1. First of all, open the Settings app by pressing on the Start button and click on the Settings icon. From there, click on ‘System’
Set Notification Priorities for Apps in Windows 10
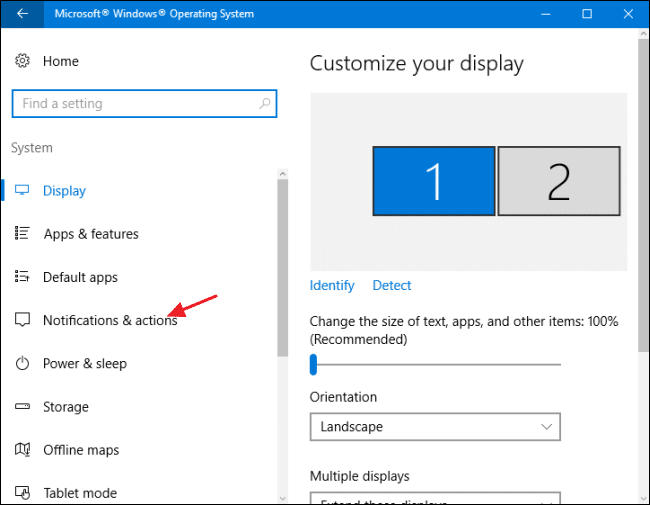
Step 2. Under the System Settings, you need to click on the ‘Notifications & Actions’
Set Notification Priorities for Apps in Windows 10
Step 3. There you will see the list of apps installed on your device.
Step 4. In the next step, click on the app whose notification priority you want to set.
Set Notification Priorities for Apps in Windows 10
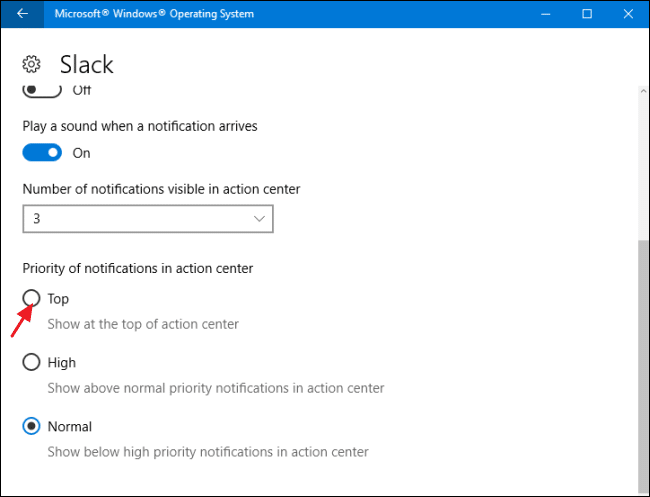
Step 5. Now you will see three Priority options. Set the Priority level as per your wish.
Set Notification Priorities for Apps in Windows 10
That’s it, you are done! This is how you can Prioritize Notifications in the Windows 10 Action Center.

So, the above guide is all about how to set notification priorities for apps in Windows 10 Action Center. I hope this article helped you! Share it with your friends also. If you have any doubts related to this, let us know in the comments box below.

Comments