How to enable Telnet Client in Windows 10
If you type in telnet in
the command prompt
you will get an error stating “Telnet is not recognized as an internal
or external command.”. This is because telnet client is disabled in
Windows 10 by default. To enable Telnet, go to the start menu and type “
Turn Windows features on and off“.

On the next pop-up, browse to
Telnet Client. Click the checkbox beside it and hit Ok.

Windows will take some time to install Telnet and once done, you can
use the telnet command in CMD or you can fire the telnet utility from
the search menu. To do that, press Win+S and type Telnet.

This will open the telnet client directly within CMD and the window should look like the one below.

How to enable Telnet Server for Windows 10
Telnet clients let you connect to other Telnet Servers. You cannot
connect to your own system and fire remote commands. For that, you need a
Telnet Server and unfortunately, there is no native way to enable it in
Windows 10. You have to install third-party apps to start serving
Telnet on port 23.
My two favorite utilities to do so are
HK Telnet Server and
KpyM Telnet Server. Both of them serve a different audience.
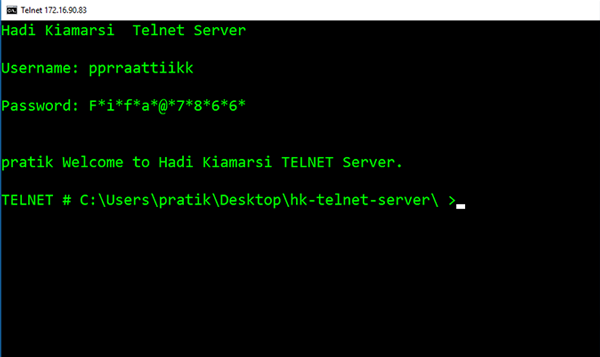
If all you want is to enable the telnet server to fire remote
commands to your machine, I would suggest HK Telnet server. It is pretty
easy to set up. Simply, download the app and launch the application. It
is more of like a portable app rather than an exe. As soon, as you
launch the application, you get a floating window.

Here, you can enter the port number where you want Telnet to accept
the connections from. The UI is pretty simple with minimum options. You
can set a user ID and password for the telnet login.
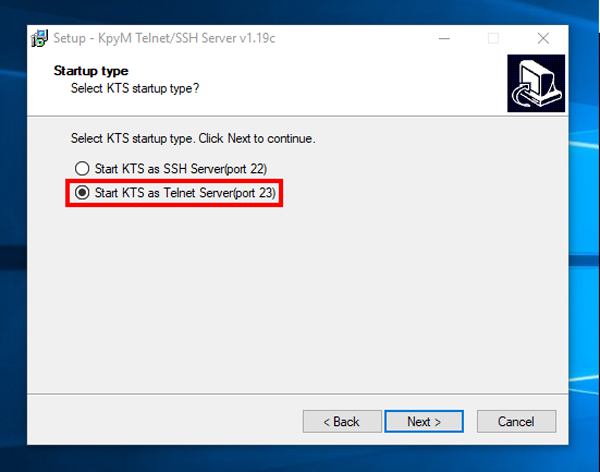
The app doesn’t provide an option to force SSL or encryption. If you
want a bigger solution with SSH like custom login message and IP
blocking then you need to get on KpyM Telnet Server. During the
installation of the app, you will be prompted to start the server either
at port 22 (SSH) or port 23 (telnet). In case, you are going to run
telnet choose port 23 now because this is the only time you will be
seeing GUI in this app.
Once you have finished installing it, you can configure further through the KTS daemon. Go to the
Start menu and type “
Setup kpyM Telnet SSH Server“.
This will open a black dialogue box where you can configure settings
like use SSL, port number, login_message, password etc. The same daemon
also provides the options to start or stop the telnet server.

Option 2 – From Command Line
You can also install the Telnet Client by issuing a command.
- Hold down the Windows Key, then press “R“.
- The Run dialog box appears. Type:
- pkgmgr /iu:”TelnetClient”
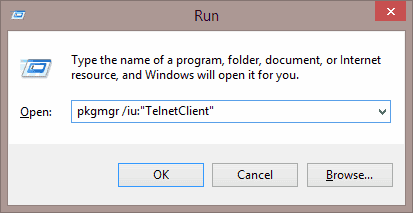
- Select “OK” and Windows will install the Telnet client.
Closing Words
Security was one of the major concerns due to which Telnet Server was
removed from Windows. It is advisable not to use telnet when you are
dealing with sensitive data. However, in the case of public servers, it
is okay if you don’t want to set up encryption key certificates and SSL.

Comments
Post a Comment